Oban sport crags topo
Over the past few years I’ve been involved along with others in developing low-mid grade sport routes at the conglomerate crags just south Oban. The crags are only a couple of minutes drive from Oban town centre at Gallanach, near the ferry to Kerrera. They are roadside, quick to dry, don’t seep much at all and provide great friendly sport climbing.
I’ve been really enjoying developing the crags. It’s also been a lot of work and expense. For all my routes, I’ve used Titanium glue-in bolts (from Titan Climbing in Sheffield) and pure epoxy resin so that they should last many decades if not hundreds of years in this coastal environment. The downside of this is the cost which adds up to nearly £10 per single bolt. Early on I received a small grant from the Scottish Mountaineering Trust which really helped get the ball rolling and fund a handful of routes. Some of you have donated for bolts via my Patreon (link here and I greatly appreciate the help), but the majority of the bolts I’ve self-funded.
The crags are laid out along the roadside over a mile or so, with five main buttresses. Below I’ve made topos and descriptions for the buttresses I’ve been involved in developing. I’m thinking of making a small paper guidebook that is more complete with all the routes, once the development is further on. There are still a number of lines I’d like to bolt yet. The crags take little drainage and seem to dry very quickly and some of the routes can even be climbed in light rain. Give the seaside location, they take any breeze that’s going, but in the forest at the foot of the routes, it still can be midday in summer. Year round climbing is possible here and the routes get the sun from mid afternoon.
Park on the grass verges near or at the parking for the Kerrera ferry. Don’t park in the passing places. If coming by public transport, you can walk to the crags from Oban town centre, or hire foldable bikes from a vending machine outside Oban train station.
HELMETS ARE ESSENTIAL at the crag as they are new conglomerate routes that have not had much traffic. Loose chunks of rock will break off. Don’t stand directly below your climbing partner while belaying. If you’ve not climbed on this rock type before, it takes a little getting used to. It follows that grades of the routes are approximate and will likely shift a bit as these routes get traffic and lose the odd hold or foothold. Let me know your grade opinions in the comments. Most of the routes are equipped with Ramshorn lower-offs which means you don’t need to re-thread or leave karabiners behind when stripping the routes. The buttresses are described below, running left to right.
The Riches

The first crag reached from Oban, situated well hidden in the trees above Dungallan Terrace, just north east of the old Kilbowie Outdoor Centre. Approach from a Lay-by opposite a house called Ardcuan. Please don’t park in the lay-by though, you’ll have to walk along the road from the parking near the Kerrera Ferry as for the other buttresses which only takes a few minutes. The buttress is 50m directly above Ardcuan. Routes described right to left.
1 Potato Hack 10m 6c
Steep burly climbing up the prominent arête.
2 First News 12m 4**
The pleasant corner and slab above.
3 Glitterati 12m 6a**
Nice climbing on some of the best rock at the Gallanach crags.
4 Ultra Rosa 12m 6c+
Technical climbing leads rightwards to better holds up the right arête of the wall.
5 Mango Loco 15m 7a+*
Good climbing left of the blue streak leads to a break and an easier finish above.
6 Mango Maxx 18m 7b/7b+*
Follow Mango Loco to just past its crux, swing left to cross the headwall of Super Rich and continue left to reach the finishing holds of Coming from You.
7 Super Rich 15m 7b*
Thin technical climbing leads to a good rest at the ledge and an easier headwall.
8 Coming from You 10m 6c*
Start from the ledge below the Offwidth and climb the left side of the wall.
9 Ill Wind 10m 6c
An unusual route bridging and laybacking up the edge of the off width crack. There is a tricky move rightward at the top to reach the anchor.
10 Ripper Ramp 10m 6c
A bouldery move off the ground (stick clip useful) leads to easier climbing following the hanging ramp. Would be much improved another quick clean.
Oakley
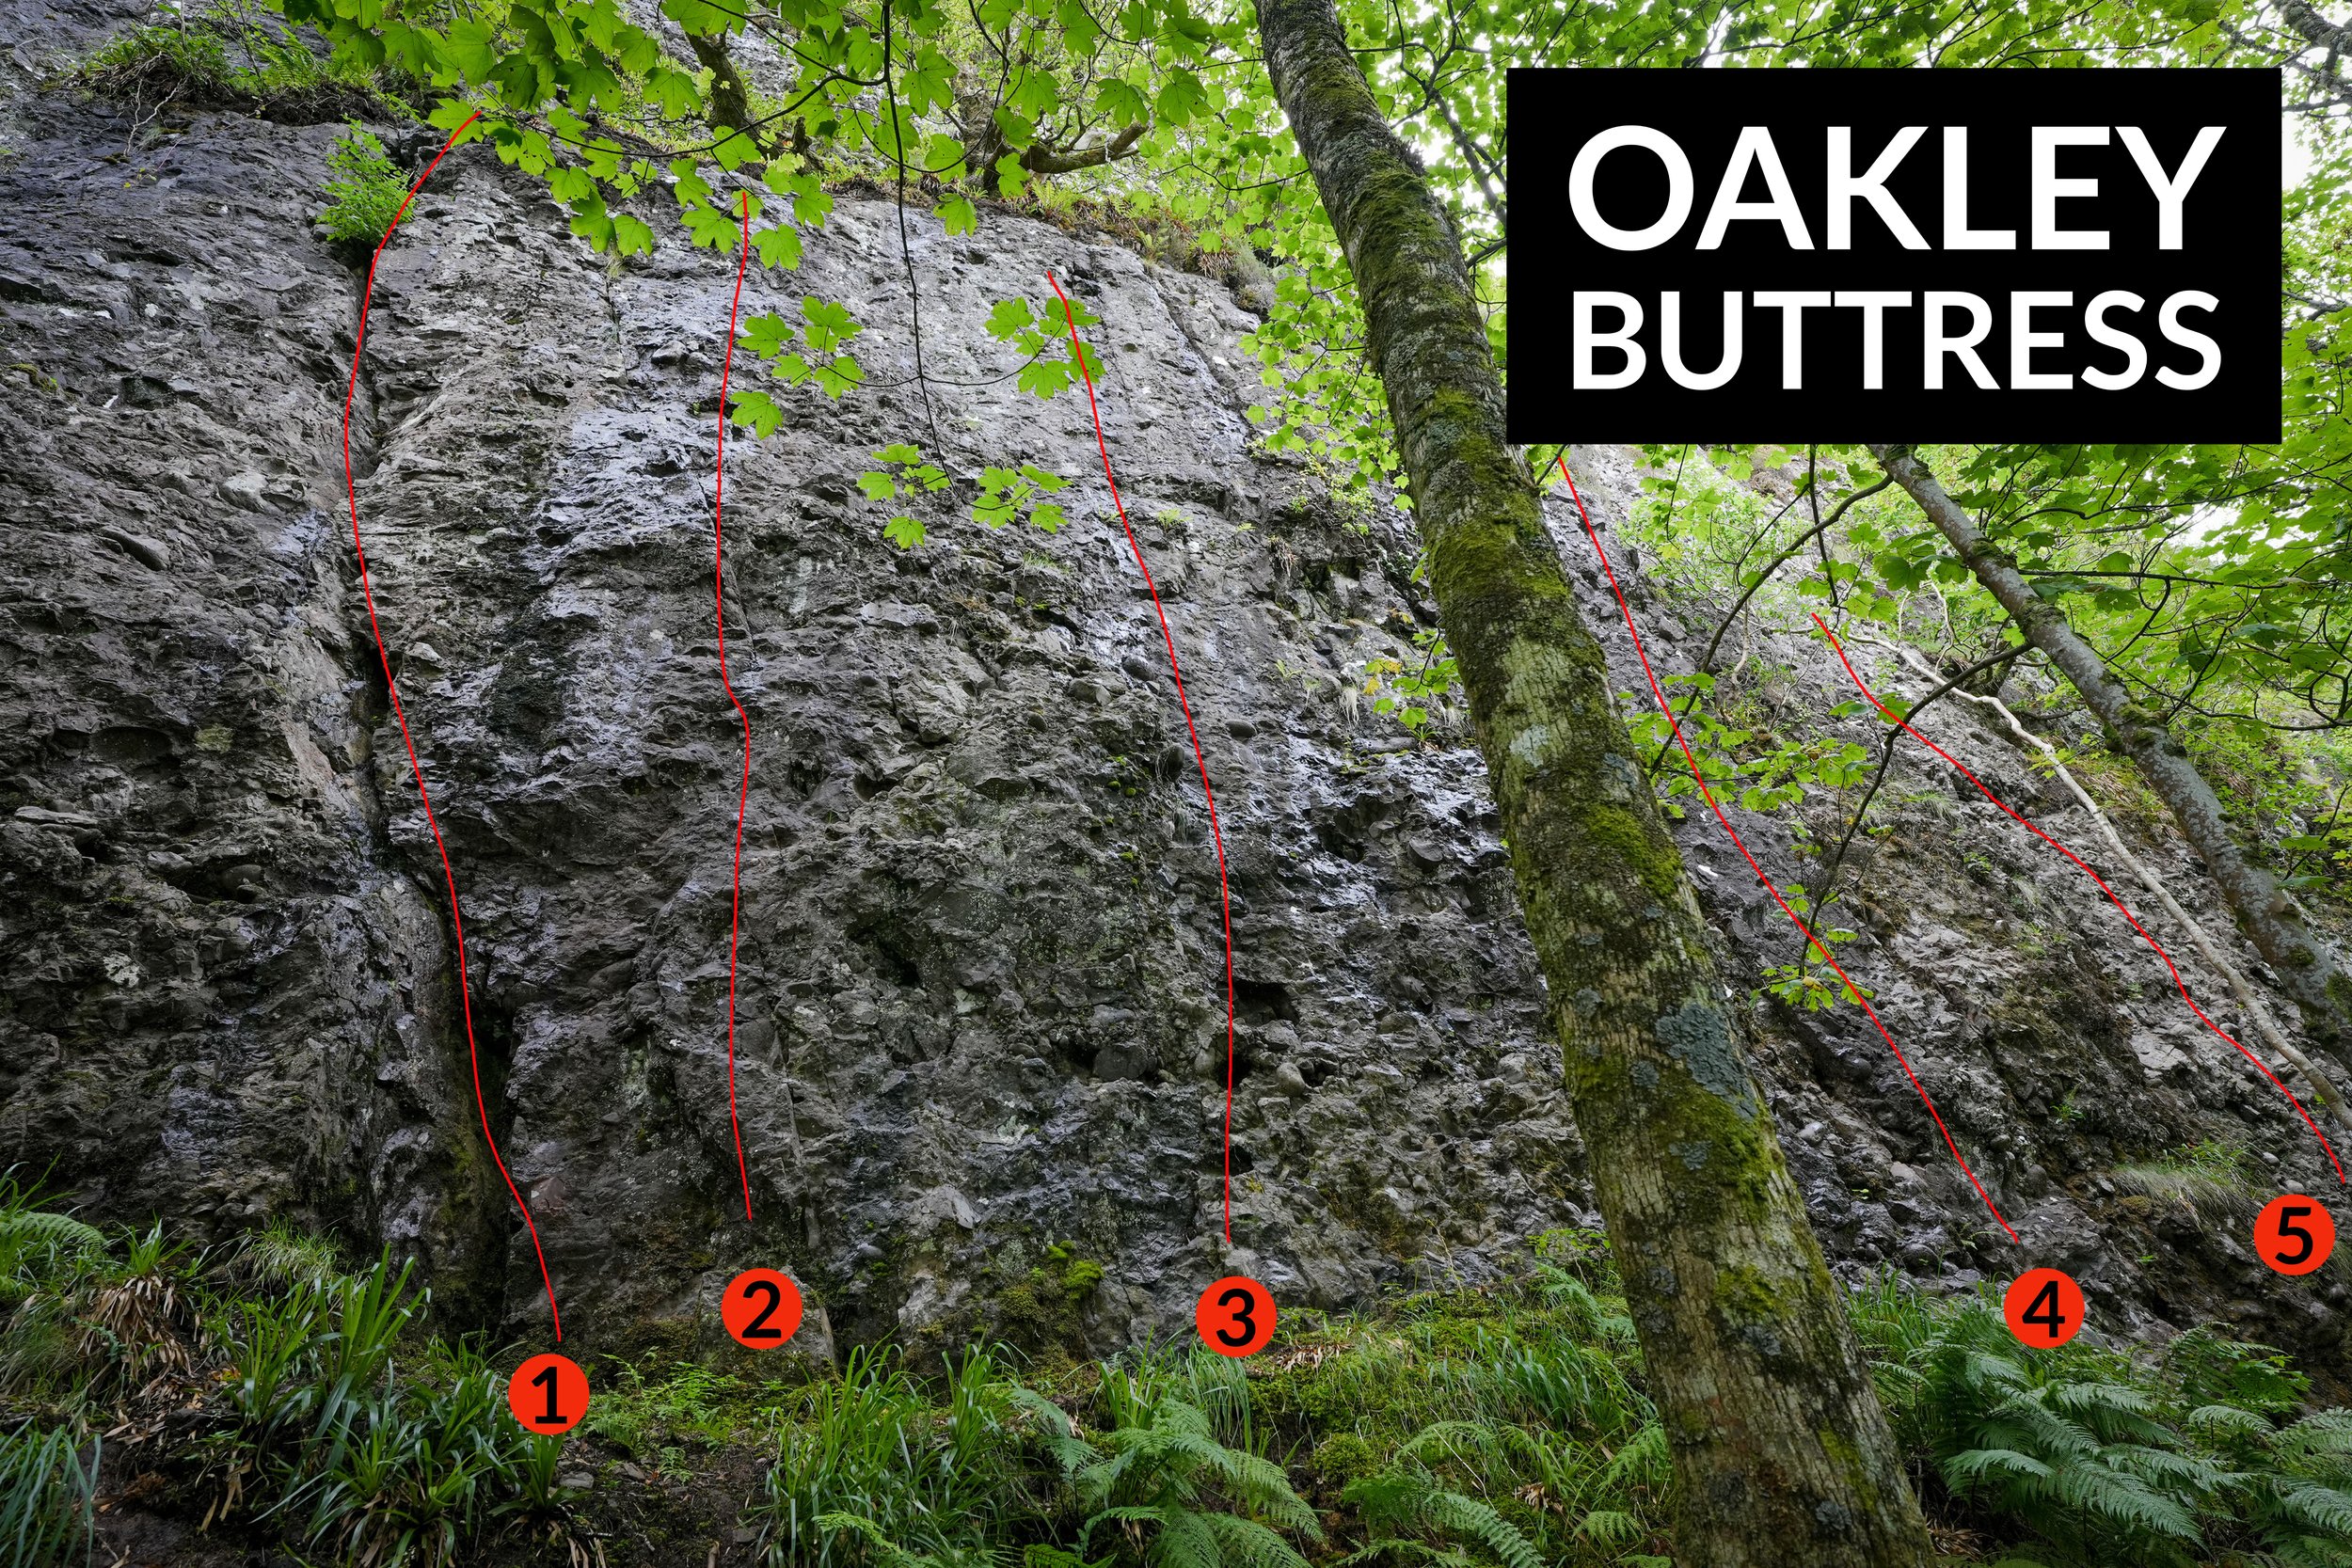
Topo and descriptions soon
Sigma Buttress
This is the most extensive buttress of the Gallanach crags with long and interesting climbs on open walls and grooves. The central routes are long and a few longer draws are useful.

1 Kilbowie 25m 6c**
The left-hand line of bolts up the vertical wall. Good climbing with some useful pockets
2 Thin White Teuch 25m 7a*
The right-hand line. Move left at the crux in the middle of the wall to follow pockets, then step back right with a couple of thin moves to reach the finishing slab.
3 Arran Victory 30m 6b+*
The leftmost line. Follow the crack in the slab then a left-facing groove. Where this peters out, move left (crux) to gain the upper cracked groove.
4 Pink Eye 30m 6c**
Follow the crack in the slab as for Arran Victory but break rightwards from the steep groove to reach an overlap. Pull through this to gain the upper steep left-facing groove.
5 Skerry Champion 35m 6c+**
Aims for the rightmost of the three left facing crack/grooves at the top left of the buttress. Follow the pocketed slab and corner of Sigma then continue up and left following a flake-crack to the spiky ledge. Crank between good holds up the overhanging wall to reach the crack.
6 Cream of the Crop 35m 7a+***
Follow Skerry Champion to the spiky ledge. The smooth headwall directly above gives good sustained climbing, trending rightwards to join Electra at the last bolt.
7 Electra 35m 7b***
Climb to a few moves along the right-slanting ramp of Sigma. Tackle the bulging overhang above with burly laybacking up the undercut flange.
8 Sigma 35m 6a***
The central snaking line of weakness, weaving its way through the steep wall. Climb the white pocketed wall and short corner above. Step slightly right and climb another white wall trending rightwards to gain a big right-slanting ramp. Move along this and then continue into the steep finishing groove (crux) of Miss Blush. A few long quickdraws are useful to avoid rope drag.
9 Irish Cobbler 35m 7a*
Start up Miss Blush but step back left on the pillar and follow a flaky crack to the right end of the ramp of Sigma. Attack the groove steep bulge above, just right of Electra. The slab above is easy.
10 30m Miss Blush 35m 6c**
A steep start through a bulging right-facing corner, followed by a blunt prow trending rightwards to the top of the pinnacle. Step right into the overhanging groove and follow it to the top.
11 15m Melody Grooves 35m 6b*
Climb the bulging right-facing corner and blunt prow but move rightwards onto grass ledges and a lower-off. Belay here if you want to climb it in two pitches, other wise use a few long quickdraws moving right onto the grass ledges. From the lower-off gain the open groove near the right edge of the crag and follow it to the top.
Roadside
Mission Creep 6a+** 35m
Start in a scoop near the left end of the wall. Climb up then left through a bulge on good holds and through the gap in the first overhang on good holds to the bottom edge of the slab above(rams horn here to redirect the rope when stripping the route). Balance leftwards on good foot ledges to a big hold in the left facing groove. Bridge up the groove to the lower-off.
The Towers

The large buttress right above the parking verge, featuring prominent arêtes.
1 Vomitorium 30m 6b***
The original line on the crags. Left of the deep roofed corner is a vertical wall with two lines. This takes the left-hand line, moving through a deep crack at half height.
2 International Kidney 30m 6b+**
The right hand line on the wall, moving past the big detached flake at half height with a crux moving left on undercuts at the last bolt to the same lower-off as Vomitorium.
3 Herbie Mhor 30m 7b*
The steep right wall of the deep corner.
4 Majestic 30m 6c***
Excellent climbing and positions on the flying arête right of Herbie Mhor. Good pockets where needed.
5 Tabula Rasa 30m 6b**
The grooves and walls just right of the flying arête.